It might be interesting to explain what all the screws do on the machine, but if you have to ask the question, buy a one-piece construction machine that requires no calibrating! There is also a no adjustment machine called a ”Crank Gouger” only available at Innoledy. There is a thread on this machine at the Oboe BBoard. Personally – apart from preferring to save my money for an oboe d’amore – I like the idea of being able to change the shape of my blade, which I think is impossible on those machines.
Calibrating the machine – general principles.
Now comes the time to actually use the gouging machine. Again, a few principles for the adjustment. I don’t know if this is justified with any scientific theory or even practical experience, but intuitively, we want any end-to-end line on the cane to have exactly the same thickness. 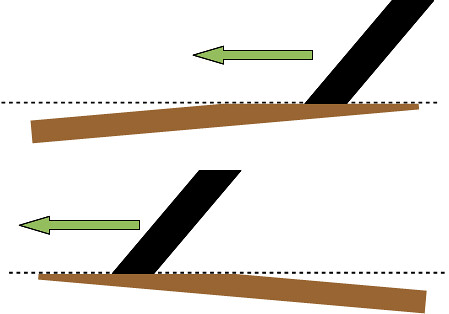 Therefore, of extreme importance is complete parallelism of the bed in comparison with the arm that the plane glides on. If there is a vertical discrepancy, either the ends or the middle of the cane will be too thin compared to the overall length at that point…. The middle getting thinner should be impossible regardless of which direction the guide or bed might be slanting. But this has happened to me a lot. Maybe my guide that has a curve in it… very possible.
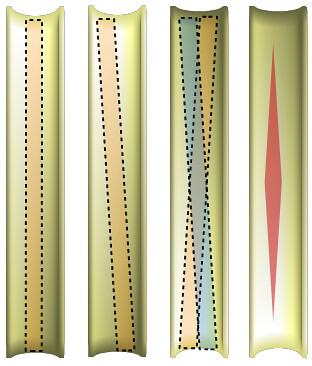 Horizontal (sideways) angles, no matter how small, means that the center thick part will not stay centered. In theory, this should actually produce a diamond-shape thick part, but in practice… again, maybe the beaten-up condition of my machine. For years, without realizing it, my machine was unable to do anything else than this because little holes in the bottom of the bed were drilled by adjustment screws tightened too tightly! No matter how I pushed or pulled with the side adjuster screws, the under screws would pull the bed back in the exact same position by sliding back in the holes.
I fixed this by filing down a flat surface for the screws with a “Dremmel tool”, but most people would criticize (correctly too) that this risks the introduction other imprecisions.
Fitting the cane: chopping length.
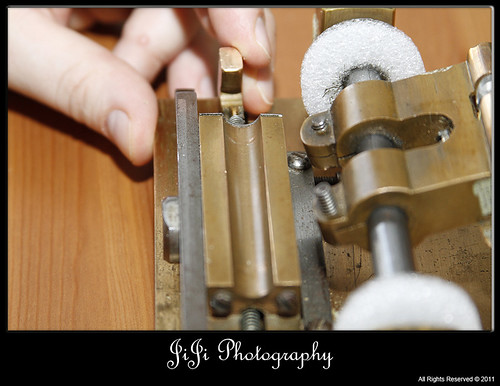 This is so simple, I don’t know why I mention it. The chopping length has one purpose alone: to make the cane fit in the gouging machine. If you use an easel to score the cane before folding, and this easel is of a different length than your gouger bed, TOO BAD: it’s the gouger that matters! On either end of the bed are usually little plates to hold the cane in place: the spring-mounted hook “pinchers” actually do very little but prevent the cane from sliding above those end-plates. Because the plane glides past these plates, to let the blade can cut the entire cane length, there must be curved holes in them to allow free movement without damaging the blade or the plane bottom itself: the bottom helps hold down the cane to prevent ripping and lifting off the bed.
The cane can be a little shorter (up to 1.5mm), but the less snugly it fits, the more risk there is of snagging in the blade and being pulled over the end plates. My machine only has one end plate: I don’t care about the one in back (right side) because it was too difficult to get the right curve on it to prevent damaging the plane and the blade. The one in front (left side) is the only one that really matters, when we’re careful, because it’s the one that keeps the cane in place while cutting.
 Shaving Thickness: cut vs. rip.
Pretty much all sources of information I have been able to find agree that the cane shavings must measure between 0.05mm and 0.1mm. Thinner than that simply does not cut enough: not only will it take a very long time to gouge (risking compression of the cane), but it just might not cut, period. More than that seems to rip the grains rather than cut them. This is significant because if grains are pulled or torn from each other, then the cane lacks its living properties; it does not “hold together” and all kinds of strange issues happen with the finished reeds.
This “video” is a bunch of still images taken at short interval. I flip the cane around every now and then because the blade stops cutting in that direction: I start the blade a little bit inside the cane, so the back always remains a bit thicker until the gouge is complete. The gouge is complete when the roller starts rolling: having reached the guide, there’s nowhere for the blade left to go. Towards the end, notice hat the cane came off the bed a little bit: this is because the cane is a bit concave (curving inward). This piece did not break and I was able to finish it nicely. The shavings change in thickness and appearance. Towards the end, it becomes barely more than dust. At that point I very carefully flip a few more times: even if the roller is rolling, there are often little bumps left over from some degree of ripping.
Grains: good and sponge-cane – a sharp gouger blade.
This is the last point on cane selection. There exist density testers for metals, hard woods, ceramics, polymers and so on. I don’t know how effective they are for cane. For myself, I roll the inside of cane on my thumbnail: if it feels smooth, it’s excellent cane (densely packed grains). There are varying degrees of soft cane and I usually don’t like them. One kind of cane I call “sponge cane” because when scraping the bark, the under part looks porous like a sponge. This is usually horrible and not worth scraping at all.
It’s actually hard to predict while gouging because a rough thumbnail roll is similar for both soft and spongy cane. Also, to really emphasize and clearly identify good, medium and soft canes, the gouger blade must be very sharp. I use the same techniques as I do on my reed knives, but with even better honing stones. Some oboists talk about leaving burrs on their knives…. aye-aye-aye-chihuahua!!! Burrs tear, they don’t cut! But getting rid of them requires great stones and a hard metal blade (always the case with gougers).
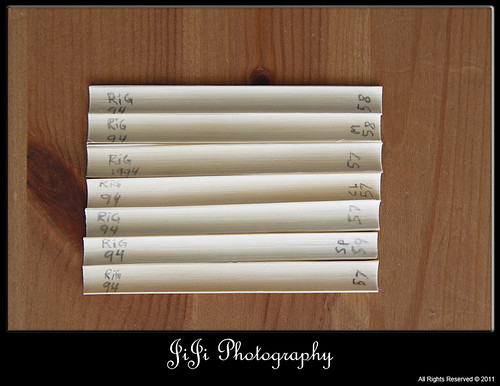
All in all, I actually have had a couple of amazing practice (not concert) reeds with sponge cane. So, again, I don’t throw much away anymore. I use coloured thread with bands of other colours to identify which reed is which and I log in a book the variables (thickness, cane quality, shaper used etc.) associated with each colour combination.
Once the machine is calibrated, no more need to measure, right? – WRONG!
The density and health factors of the cane will change the actual final thickness of the cane. This means that:- the machine can be made of the best metals: this ensures tolerances of 0.01mm or less
- cutting other metals, polymers, ceramics and glass would confirm these tolerances
- cane is a plant (soft, not actually wood) and some degree of compression, “bounce-back” and ripping will occur.
I have not compiled any statistics (variance extremes and standard deviation), but as much as 0.08mm variation has been observed….. due to the beaten-up condition of my very old brass machine that does not even use ball-bearings? Perhaps, but the following observations should hold true on even the best of machines:
- The hardest (densest) cane seems to gouge the thinnest, but not always.
- The softest, spongiest cane tends to resist thinning due to “bounce-back”. It absorbs most downward pressure from the plane and seems to decompress afterwards. End result, less effective cutting.
- Sunny days tend to gouge thinner than cloudy/rainy days.
Theoretically, gouging wet means the thickness measurement should reduce as cane dries and shrinks. This does not matter as long as measurements are always taken in the same state (wet or dry). And people have been reported to like their cane with thicknesses ranging from 0.42mm to 0.68mm, so the important thing is that each oboist determine her/his preference and go from there.
6 comments:
Hi Robin,
You say "Pretty much all sources of information I have been able to find agree that the cane shavings must measure between 0.05mm and 0.1mm." I was always taught between 0.04-0.06. This range not only depends on how sharp your blade is but how well you can match your guide to your blade curve. It's kind of a bragging point for some people. I was once told Tabuteau could get a perfect 0.02!
My sources are Internet only (very few) including the BBoard. Like I said in the previous post, no claims of being the expert. But its amazing that you and Tabuteau are/were able to get such thin shavings and it still cuts! I assume that this increases quality by reducing ripping.
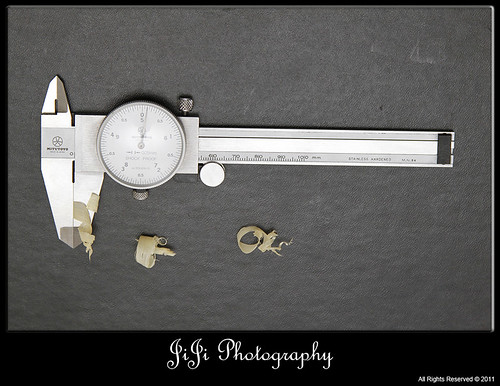
It must take a very long time to gouge a piece. My blade is hard and sharp enough for it, but the rest of the very old and oxidized brass and iron construction is just too shaky. I assume you're using a caliper or flat surface micrometer, because a ball-point or sharp-point comparator will dig in the cane when so thin.
Robin:
A few tips for you.
You should trim the four corners of the pregouged piece before gouging. Use an old reedknife and just freehand 45 degree corners. With this sort of machine it will improve the way the cut begins. Also from hard experience I have learned that even though the good sharpening stones (Japanese) are excellent for reedknives, a piece of glass and graduated emery papers leading up to some 2000 grit paper will have better results with gouger blades.
Also: go back to soaking the cane for a time. It will give better results. Just don't oversoak. If the cane is pregouged you will get good results after 1/2 hour in warm water. But OK to pregouge dry.
Use a circular file to gently remove the unnecessary metal on the end stop at the front and put it back on the gouger. (Where did you get it? It isn't a Graf but could have been made by an imitator: Bhosys?) That cane stop does have a function and the gouger will work better if you get it right. The goal is to keep the piece of cane from bouncing around too much when you move the carriage back to the start position. The only part of it that really matters is the very tip at the bottom of the bed which has to poke up just enough to hold the cane. So your goal is to have a larger diameter than the bed by some degree so that there is just a little sunrise showing.
You are definitely not getting enough cane with each pass. The blade is probably dull or the back angle is too steep & metal is rubbing on the cane behind the cutting edge. Or the blade is somehow not matching up right with the guide. Put pencil marks on the guide and see where the cane rubs the pencil off when you are gouging to see if there is a high spot on the guide. Or put pencil marks on the cane and watch to see how the lines disappear as you start to gouge.
When you sharpen the blade lay it flat on the paper (with glass underneath for support) and after a few dozen passes take a look at the blade: be sure the flat side is not showing signs of wear. That would look like a curve of untouched metal around the cutting edge. If you see that, you need to put in some time with coarser paper flattening out the blade Don't be in a hurry because it will take a while. There will be a little burr which you should take off with cotton cloth or denim.
Don't bother trying to figure out how many pieces you can get without resharpening the blade. That's about as pointless as trying to avoid resharpening your reedknives. Just get good at it by doing it a lot. Weekly maybe. Let the people who want to figure out how to make a lot of bad reeds in a hurry have their day in the sun though!
Thank you very much for so much info! Very useful indeed.
I was thinking of making new front and back plates out of a plastic material that can be shaped with a rat-tail file (as you suggest) but will also "conform" to minute shavings if the blade is just a little "off".
My blade cuts off shavings of near 0.1mm, which some consider overly thick. I get little cane per shaving because the blade starts ON the cane, not behind the back end. If you saw the blade, you'd understand its underside (bevel) is not a problem :-)
I try your sharpening advice: especially that you mention the curve around the cutting edge: had noticed many times & wondered.
Thanks again!
It will take time to get it the right shape but it is better to use the original metal cane stop. One advantage of it being metal is that you can rough it up just a bit with a really coarse file so that the tiny crescent (at the bottom of the bed) that actually holds and stops the cane has a bit of a rasp to it on the inside surface. That can do a little bit to keep the cane from twisting. You have to get the shape and position right. Have you learned the "cigarette paper trick"? That's where you place a single piece of fresh paper over the bed of the gouger and GENTLY drawn the carriage backwards. If there is a place where the blade is touching the endstop or the bed itself you will see a tear in the paper. Done carefully this test can reveal alignment issues so you can fix them without ruining the blade and having to restore it!
Also, lay a piece of 1500 paper in the bed, face up. Put a rocker arm down over it, press gently, and draw the paper out. You will be improving the curvature of the tip so that it lays dead flat on the bed. This will improve the way the cane is held down and help keep it from slipping sideways.
The bed might be in the wrong place (left to right). Fixing that will be a little nerve wracking because you have to keep the bed parallel to the rod when you release the screws underneath, move the bed to the left, and retighten. The blade should definitely begin the cut from the very end of the cane--if I read this correctly the bed position is too far to the right to make that possible?
There is a "microbevel" immediately behind the cutting edge and that can have some ghost effects on the cut that you might overlook just because the basic bevel is pretty acute. So be careful there.
Does the carriage wiggle on the rod? God help you! (There is a a way to work through that problem but it means being very careful about pushing EXACTLY the same way for every stroke.) Keep the rod really oily--I use 10W 30.
Thank God, the Carriage does not wiggle (it has no ball-bearings), and yes, I had to spend days getting the alignment right betweeen the bed and the carriage rod.... that's when I noticed the Allan screws had dug holes in the bed: no yaw adjustment possible.
Thanks for your advice on the stoppers etc.: I will indeed follow it. I can make new stoppers from old computer box panels: will take time but the metal is workable.
Post a Comment