Monday, September 26

Playing with myself (OBOE!!!)

Playing the 2 parts of the duet myself.
Here is one movement of the Telemann Flute Duet in A major (without continuo). I’ll do artistic reflections in the next  post.

I think this went pretty well. I had never played this piece at all before and have been practicing less than 30 minutes a day for about a month because work has been rather demanding. I think the sound quality is much better than before:

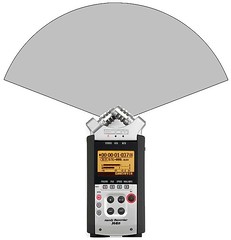
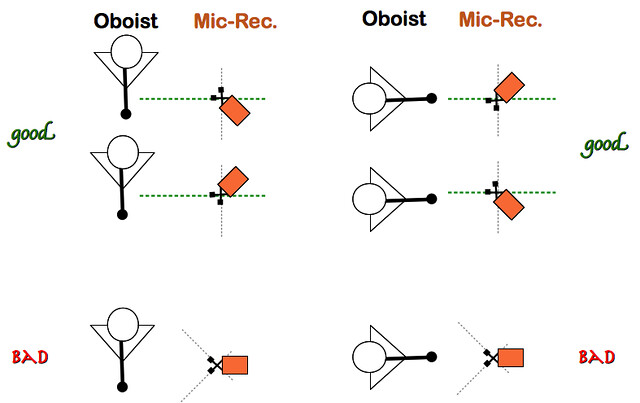
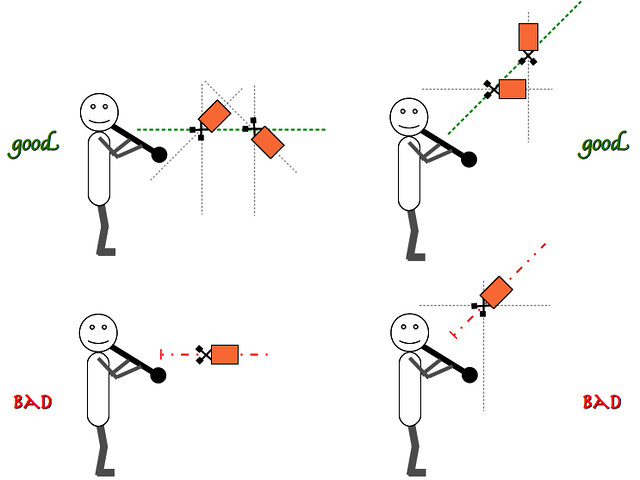
  1. the microphone position in the room really helped quite a lot
  2. I think the season is helping me play with a better sound and develop more discriminating ears
  3. I think Facebook discussions have developed more demanding ears, requiring me to breathe better in order to achieve that sound I seek.

I am amazed at how much the Oboe BBoard, Facebook and You-Tube have helped me develop musically and artistically. This was simply impossible back in the days I was a music student and beginning pro, unless you were wealthy and could travel often overseas. This is truly an exciting time to be a budding musician!

Nerves while recording

Recording this required 2 runs at it:

  1. The first time, before lunch, I had to do many, many takes because I was always making silly mistakes that I just could not hide in any way. So I just stopped with one merely half-decent take.
  2. The second time, after a lunch break in front of the TV, I felt more relaxed and did everything just right on the first try! I fact, oboe 1 and oboe 2, I did two (relatively) fine full recordings without stopping or repeating anything. Though the recordings still have flaws, I decided to stop here while I was happy with the work.

Conclusion:

I stopped the first run completely discouraged and feeling ridiculous. This is NOT a difficult piece and when practicing, it always goes fine. Yes, it does need to mature: the 1 month I have gained its acquaintance is not enough to really feel its flow, but I have still been playing it with feeling from the very first reading. Different takes should be to change a phrasing, not because of mistakes.

During the second run, I was motivated and just enjoyed the energy of the piece while playing. Maybe I was hungry before and needed some energy and a break. But I think the mental aspect was the worst of it. I think I need to do more recordings, more often, and not care if they sound well or not. The exercise of recording and showing on You-Tube might act as a surrogate for live performance, challenging stage fright and allowing me to focus more on the musicality.

Sunday, September 18

Rare wired reeds!

Changing the background because the seasons have definitely changed here!

Telemann Flute Duets and metronome recording…

I have a couple of movements from Telemann’s flute duets coming, but there is a bit of difficulty in playing with myself….. mostly in terms of stable rhythm. I need to work with the metronome more because I rush some groupings and slouch on others… not in an artistic fashion either!

My solution is simple: the Zoom H4n has a built-in metronome that I can hear in my head-set when recording, but does not sound when playing back. The movements I chose sound fine in strict tempo – lots of room for dynamic expression – so I will do that for the experiment.

Wired Reeds… me?

I have tried several times in my life to use wire for my reeds to help control opening, stability, ease of playing and so on. My conclusion has always been that wire just doesn’t work. Well, things have changed!

Two of my reeds were “slipping” (sideways offset) quite horribly. I was going to break them, except they played rather well…. apart from choking as a result of slipping…  I decided to try using wire around them: for the first time in my life, this actually saved the reeds! Note that the purpose was to save already good reeds, wrecked by slipping: not to try to fix bad reeds!

European (short) Scrape – adaptive method

I read more and more questions about European scrape (I combine German, French and other short-scrapes because I explain the differences with methodology). Over the next several months, I hope to explore these questions and hopefully provide solid guidance. I am NOT Albrecht Mayer, I am NOT François Leleux and I am NOT the best reed maker to be found but I have done enough experiments to provide beginning guidelines for stable, well sounding and flexible reeds that are also easy to play.

IMG_6589 IMG_6576

(Click on the images below to open the REALLY big original pictures!)

To start off with, here are some pictures of very different reeds. They play differently, sound differently look different and this will help a discussion on how to get what you want with respect to the cane you are using. Be careful not to judge on what you see: later I will give sound clips on them and you might be surprized.

High-definition pictures:
much more revealing than backlighting!

Taking pictures of reeds is difficult! I have a fantastic high-definition (1080p) web-cam, but I can’t get as good pictures as my wife: she can handle lighting much better and faster to show the smallest details in the grains. I find this shows flaws in my scraping much more clearly than backlighting. If I can setup my web-cam to take good pictures, that will help my reed making quite a lot!

The really big images (on my wife’s Flickr account) shows scraping trends which you might think give horrible reeds… but all these reeds play very well. You might also think that the differences are so great I used different techniques or get really different results… actually, some that look the same play more differently!

In subsequent posts, I will provide crowing and sound tests on these reeds, compare the sounds, say what I like and dislike about them and perhaps “adjust” a few.

Sunday, September 11

Microphone Geometry

I followed the advice of Craig Matovitch on microphone placement and put my recording device on a cheap tripod which I put on my desk. This way, the desk table is not blocking out half the sound waves! I found the experiment very much worth while: it really helps create a more living sound, even in my stuffy study/studio.

The following observations pertain to recording the oboe at home. If you record voice or another instrument, or if you have a sound engineer working in a studio or concert hall, all these observations might be completely useless.

1-2 microphones & different ranges of sound capture:

There is a lot to know about microphones (basics of it here)… too much for the home-recording amateur! Still, a few simple considerations can spare a lot of wasted time and frustrated efforts:

  1. How many microphones on your recording device?
  2. What is the area coverage (capture angle) of the microphone (or set of microphones)?

Good quality recording devices are practical because they contain the microphone, recording and playback capabilities all in one gadget: no computer, no cables, nothing cumbersome to carry. The better ones have 2 microphones for stereo sound capturing (better approximate what we hear with 2 ears).  There are different types of microphone and there is a full vocabulary to describe them. In a nutshell, and in common language, we can think of 3 considerations:

  1. close and far range sensitivity,
  2. wide area coverage or focussed point sound capture,
  3. different ranges of frequency sensitivities.

The frequency sensitivities can be understood as follows: some microphones are better suited to percussion, others to tubas, others to piccolos and others for voice. In fact, the best web-cams for tele-conferencing focus on clear spoken voice, but they are terrible for recording the oboe!

For range and coverage, this table should explain well enough; click on the image for more explanations.

Focused area microphone. Wide area coverage microphone
Zoom h4n at 90 degrees Zoom h4n at 120 degrees

Angle for true oboe sound and the atmosphere of a lively hall.

The last consideration for home-recording is how to capture the truest sound of the oboe and get a lively atmosphere. For this, I can only say that pointing one microphone directly to the oboe will get the right sound and the other microphone will pick-up room reverberation for the atmosphere. It is difficult to say whether it is best to point the other microphone points forward, up, down or backwards, the results will change according to the room layout, proximity to walls and so on. A few minutes of sound sampling is a worthwhile experiment. I have also found that the microphone below or behind the instrument adds a lot of buzz to the recording. Otherwise, the following images should be clear enough.
Good/bad mic. positions (top view).
Good/bad mic. positions (side view).