Awhile ago on the OboeBBoard (excellent place, by the way), someone asked where he could get affordable cases because he wants to carry as many reeds as possible with him. My wife took some excellent pictures of some reed cases I made myself which I linked on the BBoard and posted on my Facebook account… but I just realized that Facebook is kind of ephemeral, posts go down, down, down the page as one’s friends add their own posts. So here is a better selection of pictures with explanations. You can find more excellent photos on my wife’s flickr account. Except for one store-bought case, they are home made, inexpensive, very solid and dependable.
I’ll start with the store-bought case for 25 reeds (I got it from Le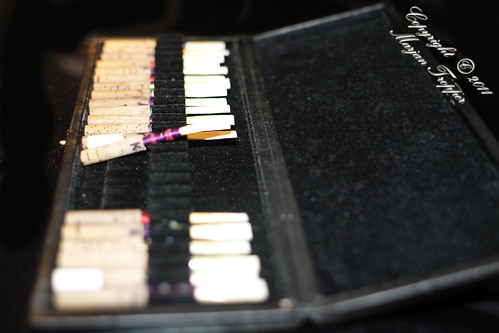 Roseau Chantant). I like it for many reasons (apart from keeping 25 reeds):
- it uses that ribbon pincher method which keeps the reeds nice and separated,
- they don’t move in the case
- mostly, it has a pivot mechanism built on a 2-level background: press on the bottom of the staple and a “dip” in the backing will lever the reed out of the pincher.
This is fantastic to prevent reeds rubbing one another or turning around and suffering breakages that way. Compared to many other cases I own with the same mechanism, this one seems better built and wants to last longer… other ones tend to loose their grip on the reeds. It was very expensive, even on sale, but I’m glad I have it as I use it a lot and it’s nice to have so many reeds side by side for comparison and categorising.
My most practical case is made of a tin box that comes when you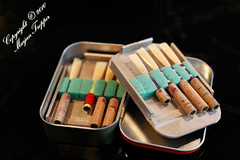 buy Fishermen’s Friends Cough Pastilles. It has just the right dimensions to put 2 levels of 5 reeds each (oboe, d’Amore or E.H.). So I have 10 reeds in a virtually indestructible box that fits very nicely in the pocket of a shirt or jacket or tuxedo! Although not necessary to do so, but made side and top walls for the levels which does 3 things:
- it gives a little extra rigidity and support to the levels,
- prevents accidents with the reed tips

- helps lift up the upper level by pivoting on the walls of the lower level (no bottom wall to impede the pivot).
I made the 2 levels of reed pinchers using thick cardboard and foam underpadding for carpets. The foam is just glued on the backing with carpenter’s wood glue and slits cut with an X-Acto knife (2 very handy things to keep around the house or apartment!). Slits cut in foam are much easier to make than those pincher ribbons and the pressure from the foam makes it easy to put the reeds in while keeping them very firmly in place. The walls are glued, but this is made easier by first taping them with ordinary office tape. The entire backing was painted with automotive spray paint: this makes it very resilient to wear, no worries about toxicity after drying, it is water proof and easy to clean with household rubbing alcohol. The foam is glued when the paint is dry and the slits are cut after the glue is very well set.
My last case works in the same way as the one above. 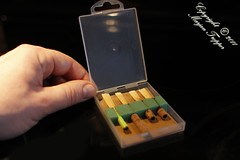 It was made hastily when I shipped my Lorée to Peekskill N.Y. to be revoiced (the revoicer wanted to know how I like reeds to better assess the final work). Once closed, the box does not open unintentionally and the plastic protects the reeds well while fitting marvellously in the smallest pockets.
I didn’t bother painting the cardboard backing because I wasn’t expecting the reeds to come back. They did come back and it turned out to be a very practical box. I’m sure you can find such plastic boxes in a variety of places, this one came from specialized cotton swabs to clean my dogs’ ears. There would have been room for a pivot-band, but I didn’t bother as it was not intended to be as useful as it finally became!
3 comments:
I too am hoping to be a born again oboe. I took about 8 years off and am ready to dive back in. Thanks for the info on reed making. It is a great start on getting my reeds organized.
You're welcome, Mellie! The toughest thing about starting again is poor endurance. On this, I can say be very choosy about easy reeds and persist! Now, 6 years after this blog started, there is very little I can't do, so it's well worth the initial pains!
From MUTS oboe support:
Why not just glue the flip out part holding the reeds inside the hinge cover?
I made a circular 6 reed holder using alligator clips padded with hot melt glue, one side epoxied within a marker pen tube. It grips the staple from the inside. This slides into a prescription bottle with vent holes drilled in it.
It can be slipped into water with reed tips touching only the water. muts(at)verizon.net
Post a Comment