Results from tying reeds.
A few weeks ago, someone at the BBoard had asked me to show high-definition pictures of my reeds tied using the Cane Guide (le Guide Roseau) and pre-binding. Look at the very large size of the picture by clicking on them: this will bring you to my wife’s photo stream where you can choose “original size”. The binding colors are reeds with the following characteristics (from left to right):
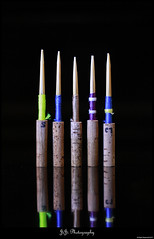 Yellow (neon green): Shaped with a Weber Wide (0.60mm gouge) and tied using the Cane Guide on a Stevens #3 thin wall staple. This reed has not yet been chopped (only scraped for blank storage).
 - Blue: Kunibert Michel 7.25 shaper with my own 0.57mm gouge tied on a Chiarugi #3 staple using the Guide Roseau. This reed has been scraped a 1st time and is playing remarkably well. A very slight slipping can be noticed. Evidently, it is not slipped at all near the thread and the blades are rather loose. I probably tied it too long and not tightly enough. At 73.5mm total length, it plays at A=440 to A=442 without any problem.
- Gold: Kunibert Michel 7.25 shaper with my own 0.59mm gouge tied on a Chiarugi #3 staple without any binding aid. This reed was finish scraped several months ago. There is a good sized offset on this one (it often slips even more while playing) that flares from binding to end.
 This means I did not hold the blades well aligned when binding. The reed still plays very freely, though the dynamic range is limited. I think the limited range is due to the offset, but the free playing is from a good selection of nicely flat cane.
 - Purple with 2 white bands: RDG –2 shaper (0.61mm gouge) tied on a Chiarugi #3 staple without any pre-binding aid. There is a moderate offset on this one which inhibits both free playing and dynamic range, otherwise, the reed is stable and responsive. The binding looks higher on this one than the others: most of my reeds finish the winding 1-2 winds before the end of the staple, so this one might be tied all the way to the end. It could also have half or one wind past the end, which would explain the inhibition. But usually, reeds that wind past the staple behave much worse.
- Blue with 1 yellow band: Kunibert Michel 7.50 shaper with my own 0.58mm gouge on a Chiarugi #7 staple. Not yet chopped (only scraped for blank storage).
Making good reeds is easy!


Most important, never try to make a decent reed “perfect” when you’re tired and/or frustrated: you will ruin it irreparably!
Theory of Reed Slipping (offset in the binding)
The following is explained at length in Jay Light’s book and the question has been asked on the BBoard. Many prolific oboists of the American reed technique do on purpose to offset the blades of their reeds while binding. I don’t like this mis-alignment, but it works for a whole lot of people and I did get a few really good reeds that way.
The question asked if it is OK for the cane to slip such that both sides of one blade are inside the other blade. Well, if a cane is correctly shaped and folded, this is impossible! For good slipping, when tying a good piece of cane, the symmetry will make one edge of each blade overlap the other. In other words, if only one side of the reed is slipped, something is wrong; if one blade is fully “inside” the other, it was not folded in the middle of the shape! So in other words, my preference is for the last diagram in this slide-show; the 2 middle diagrams are OK by American standards and the 1st is just plain wrong.One thing I should note is that many people believe it is necessary to offset the blades to prevent air leaks: this is completely false as most of my reeds that leak also have offsets whereas those that are tied in perfect alignment never do.
12 comments:
Fantastic post my friend. I actually do no.1 of your slipping animation and i shape precisely i believe (also sometimes use shaped cane from le roseau chantant). I swear by it because it's the only way for the cane to not slip further if it ever happens to slip (still possible in your final diagram although ideal). The best Ke Xun reeds seem to have that too. Nice playing and keep posting!
Thanks for the post Robin!
[Also posted on the oboe bboard]
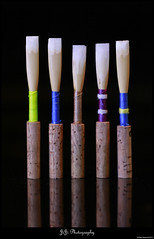
Inspired by your wife's photos I used my point-and-shoot Olympus fe-35 in Macro mode to take the attached photos. These were all shaped on a 7.00mm P. Angelo shaper (dubious provenance), but the staples are a mix. Even the plastic Nissen tubes are actually a mix - they are re-corked staples.
jhoyla
http://www.flickr.com/photos/jhoyla/sets/72157604776789114
Howard: this means WAR! :-) No, I mean if you get good results with full inner slip, then I have to experiment with that and see for myself.
Thanks for the compliment!
JHoyla nice pictures on your site. Photographing reeds is HARD!!! It takes the right equipment technique and mostly know-how about the lighting. My wife is definitely in the big-leagues!
Your finished reed looks like my blue one. We'll have to discuss on the BBoard.
I also use a "puller" spool, but I failed to match your ingenuity in getting an electric screw-driver to get the thread on.
Hi Robin,
Actually, after much trial and error, I've decided to go for the German way: We make the 'inner slip' (as you call it) on purpose, and I think it needs some explaining.
After years of American reed making, I can say that binding both blades perfectly aligned is difficult (though possible). But even when you succeed, the problem is the slippage often happens with time. I've often had reeds that started well and after a week or two started slipping in one direction. That's natural and expectable, since blades are vibrating and held only at their base.
The problem with having misaligned blades is that it's not a controllable variable - you can't reproduce exactly the same slippage every time and make sure it doesn't change. If it cannot be finely controlled and reproduced, you don't want to base your technique on it, because you're introducing "chance parameters".
So we have a way of tying the reed so that one blade is *always* inside the other. This way, not only you never have slippage (except in rare cases of bade shaping), but the blades also vibrate much more since they always vibrate *against each other and symmetrically*.
If I was to choose one parameter that transformed my reeds to the little beauties they are today, it would be this one :-)
Hello again Emmanuel!
So you agree with Howard - I definitely have to try this now! How do you acheive this, is it by rolling the fold so one blade is slightly higher than the other?
I did American scrape for the first few years of my studies, but abandoned it in favour of a European hybrid. I have tried American several times after, under the direction of oboists who swore by the technique..... it just made me swear even more AT it!
A few years ago, I decided to apply engineering methodology and investigate the best way (for me) to make reeds (including a re-investigation of American scrape). Conclusion: it depends on the thickness and other qualities of the cane, but my preference is for a scrape based on the German/French techniques.
I will try your recommendations. Merci encore des visites et des commentaires!
Well, in a few months you'll be able to read about my own investigations onthe subject... I'm working on my own website :-)
Keep up the good work
I am very anxious to see it!
Keep up the excellent playing!
And thanks again for visiting here!
may I ask which style your reeds are based on ?
I love questions!
My reeds COULD be called Franco-German, but they are the result of experimentation. Years ago, I used to make American style until I got frustrated with dizzy spells. My teacher, at the time, showed me a modified French, but even that was a bit finicky because I concentrated on the final look, not the process.
A few years ago I decided to throw away all pre-conceptions and just experimented on how I could easily make reeds that sound the way I want them to and play well. I have found a methodology that has been consistently successful, barring things beyond the control of the reed knife!
I'll be explaining them more as time allows, but for now my method is explained at:
http://robin-hautbois.users.sourceforge.net/anches/index.html
I do no1. Having one blade sitting inside another is the only way to have perfect tuning for every reed as the blades never move and the internal volume stays the same. All my reeds are profiled using a rieger profiler, gouged to the same thickness, cut to the same lengh and I even use a density gauge... out of 10 reeds made, 8 will be almost identical, one will be outstanding and the other in the bin.
Jerome
Principal Oboe of UAE NSO Symphony Orchestra
Thank you very much for that insight, Jerome!
I'll have to edit this article and try it for myself. I have always found offset blades to make the reeds feel choked.
... the important point you make is that 90% of your reeds are good: this also proves that making concert-grade reeds is not supposed to be a nightmare!
Post a Comment